Nail Interlock Tips for Perfect Home Nail Designs?
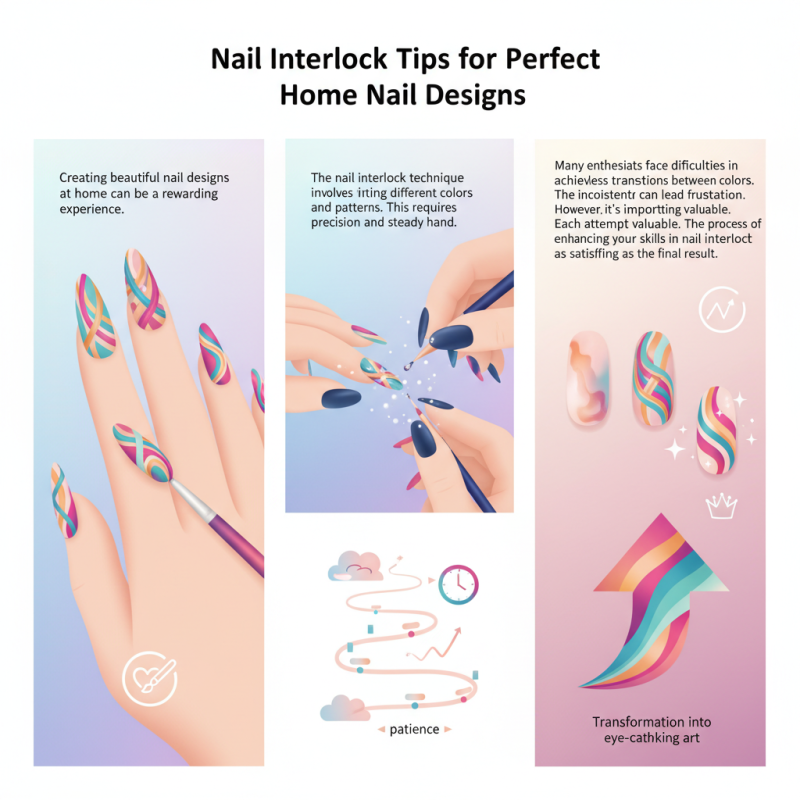
Creating beautiful nail designs at home can be a rewarding experience. The nail interlock technique is a popular approach to achieve stunning results. According to nail art expert, Lisa Johnson, “Mastering nail interlock can elevate any design to the next level.” Her insight underscores the importance of this technique in modern nail art.
The nail interlock method involves intertwining different colors and patterns. This requires precision and a steady hand. Experimenting with various designs can lead to unexpected results. It’s essential to practice patience, as perfecting the nail interlock technique can be challenging for many. Mistakes often happen, and that’s part of the learning journey.
Many enthusiasts face difficulties in achieving seamless transitions between colors. The inconsistency can lead to frustration. However, it’s important to embrace the imperfections. Each attempt teaches something valuable. The process of enhancing your skills in nail interlock can be as satisfying as the final result. With time and practice, these techniques can transform your home nail designs into eye-catching art.
Nail Interlock Tips: Understanding the Basics of Nail Design
Nail design has evolved significantly, offering endless possibilities for creativity.
Understanding the basics of nail design is essential for achieving stunning nail interlock techniques. A survey by the Professional Nail Associations reveals that 72% of nail technicians believe that learning the fundamentals greatly enhances the quality of their artwork.
To begin, mastering color theory is crucial. Choosing the right color combinations can transform a simple design into a breathtaking masterpiece. Think complementary, contrasting, and even unexpected color pairings. One tip is to always test colors on a nail wheel before the actual application. This allows you to visualize how shades interact under different lighting conditions.
Another basic concept is nail shape. Each shape serves a different purpose and can influence the overall look. For example, almond shapes can elongate short fingers, while square shapes can offer a modern edge. It's common to rush this decision, but taking time to assess your options can make a significant difference. Remember, not every shape suits every hand, and this can lead to unflattering results.
Lastly, practice precision in your application techniques. Inconsistent brush strokes or uneven layers can detract from your design. Start with a steady hand and use thin coats to prevent clumping. It might take time to perfect your skill, but the journey is part of the fun. Don't be afraid to experiment and make mistakes; they often lead to unique outcomes.
Essential Tools for Nail Interlock Techniques at Home
Creating stunning nail designs at home is easier with the right tools. Essential items include a quality nail file, a buffer, and a good base coat. A clear polish is also crucial for a polished finish. Don't forget about nail art brushes and dotting tools. These help create intricate designs. A wheel of nail decals can add variety and flair.
Nail interlock techniques require practice. You might find your first attempts uneven or overdone. The key is patience. Take time to study your work. Small details matter. Using different hues can lead to unexpected results. Sometimes what seems perfect at first may need adjustments. Consider using a light hand. This helps prevent mistakes during application.
Lighting plays a vital role in nail art. Natural light can show color true-to-life, while artificial lights may distort it. You may accidentally apply the wrong shade. Adjust your workspace for better visibility. Finding the right angle can help too. Stay flexible with your designs and embrace imperfections. They can lead to unique, creative results.
Step-by-Step Guide to Creating Stunning Interlocked Nail Designs
Creating interlocked nail designs is a fun and rewarding process. To start, gather your supplies: nail polish in various colors, a topcoat, and nail art tools. According to a recent report from the Nail Industry Council, 61% of consumers prefer unique designs over solid colors. This trend shows the rising demand for creative nail art among enthusiasts.
Begin by applying a base coat. Allow it to dry completely. Next, choose your first color and paint two nails on each hand. But be careful; uneven strokes can ruin the look. After it dries, use nail art tape to create the interlocked design. A common mistake is not pressing the tape firmly, leading to gaps. The Art of Beauty Study indicates such errors can result in an unsatisfactory final appearance.
Once your design is in place, apply the topcoat. This step protects your art and enhances its vibrancy. While practicing interlock designs, expect that not every attempt will be perfect. Minimal smudges or uneven edges can happen, and they can be frustrating. With time and practice, you’ll develop your technique. Remember, even professional nail artists have off days. Reflecting on your work will help improve your skills.
Common Mistakes to Avoid in Nail Interlocking
Creating beautiful nail designs at home can be enjoyable, but many make common mistakes in nail interlocking. One frequent issue is misaligning the patterns. When interlocking designs, ensure they line up perfectly. If they don’t match, the entire look can feel awkward. Consider using a steady hand and good lighting to avoid missteps.
Another common pitfall is overcrowding. Some may try to include too many elements in one design. This can lead to a messy appearance. Instead, focus on a few complementary colors or shapes. Pairing basic elements creates a clean, polished look. Sometimes less is indeed more in nail art.
It’s also essential to let layers dry completely before adding more. Rushing this step leads to smudging or uneven textures. Patience is crucial in nail interlocking. Skipping this can ruin even the best designs. Practicing mindfulness in the process can significantly improve your outcomes. Being aware of these details makes a substantial difference. Tailor your approach as you learn from each attempt.
Maintaining Your Interlocked Nail Art for Longevity
Maintaining your interlocked nail art is essential for keeping it fresh. The longevity of your designs depends on how well you take care of them. Regular upkeep prevents chipping and fading, ensuring your hard work lasts.
One tip is to avoid soaking your nails in water for long periods. Water can weaken the polish and cause it to lift. Try wearing gloves while doing dishes or cleaning. Additionally, apply a top coat every few days. This adds a protective layer and enhances shine.
It's important to evaluate your technique too. Sometimes the interlocking can be tricky, leading to uneven edges. If you notice the design isn’t holding up, it might be time for a touch-up session. Don't be discouraged by imperfections; embrace them as part of your unique style. Regularly check your nails for any signs of wear and get creative with quick fixes!